Arabic is the 7th most spoken language in the digital sphere. The number of the Arabic websites is increasing every day and the number of the websites localizing their content to attract more Arabic speaking users is growing. The techniques used to develop RTL websites are still misunderstood or mysterious for some. I will try to shed some light on the problems I have been facing and the tricks I am using to build RTL websites.
Note: Arabic is not the only language that is written from right to left. Persian and Hebrew are also written in the same way so relevant speakers might find the posted information useful.
The semantics
The first step is to declare the direction of the document by attaching the dir attribute to the html tag with the value rtl. This will affect the document rendering in many ways:
- Text will naturally be aligned to the right.
- Margin and padding of some elements will be calculated differently.
- Table directionality.
Note: The value of using the direction attribute in the HTML rather than the CSS is to add semantic value. The change we are making is not just for presentations. It will also ensure that the document will render using RTL if for any reason the CSS files fails to load. The dir attribute is also used in conjugation with the lang attribute which specify the natural language of the document.
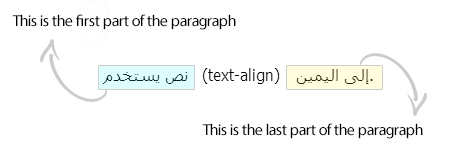
Text alignment
Text natural rendering is different from aligning text to the right. Consider the following:
See the Pen jGkav by Ahmad Alfy (@ahmadalfy) on CodePen.
If you pay close attention, you will find that the fullstop that is supposed to come by the end of the sentence is coming at the beginning on the first paragraph. The second paragraph however, placed the fullstop at the correct place. That’s not everything, let’s try and mix some Arabic and English text together using the same example we used before:
See the Pen arqLy by Ahmad Alfy (@ahmadalfy) on CodePen.
The first paragraph is corrupted and almost unreadable. This image explain what is wrong with it:
Using the RTL direction defines a (complex) algorithm for determining the proper directionality of text. This will ensure that the whole sentence will be presented as RTL and the embedded English sequences will be properly reversed by the bidirectional algorithm.
Working with numbers
Even in the languages that are written from right to left, numbers are meant to be read from left to right. Applying RTL direction to it corrupt its display. Check out the following example:
See the Pen kGnat by Ahmad Alfy (@ahmadalfy) on CodePen.
If we decided to eliminate the spaces between the numbers and use dashes, we still face the problem of the “+” character that comes at the beginning.
The solution is fairly easy. Usually wrapping it in a span and give it a class number and style it using CSS:
span.number {
  direction: ltr;
}
Calculating margin and padding
User agents apply default margin and padding to some elements like ordererd, unordered and definition lists. Setting a document’s direction to RTL will produce a mirror image of the element like this:
See the Pen caork by Ahmad Alfy (@ahmadalfy) on CodePen.
The way the browser achieve it is very interesting. Webkit based browsers and Mozilla Firefox uses a non-standard CSS properties:
/* Webkit based browsers */
ul {
  -webkit-margin-start: 0px;
  -webkit-margin-end: 0px;
  -webkit-padding-start: 40px;
}

/* Mozilla Firefox */
ul {
  -moz-margin-start: 0px;
  -moz-margin-end: 0px;
  -moz-padding-start: 40px;
}
These properties would have make life easier if they were supported by every browser. The -start will be translated to be right or left according to the document’s direction. It makes perfect sense to use it except that they are not supported by Internet Explorer. When I tried to understand how IE handle this issue I didn’t find anything unusual. It utilizes the regular padding property and the browser itself flip it.
Table directionality
When the browser render a table in RTL mode the starting point of the table will change. Try to change the direction of the table below using the checkbox:
See the Pen Hqmyd by Ahmad Alfy (@ahmadalfy) on CodePen.
The stylesheet
Changing an existing website to become RTL is achieved by writing CSS that overrides the original stylesheet to make a mirror image of the original layout. The changes mainly affect the following properties:
- Text aligning. If it was specifically declared, it should be flipped.
- Floats. It’s easy to flip floats; right becomes left and vice versa.
-
Margin and padding. Values should change from clockwise to counter-clockwise. Individual horizontal properties should be resetted and the counter property should be set.
.selector-1 { margin: 5px 10px 0 15px } /* RTL override */ .selector-1 { margin: 5px 15px 0 10px } .selector-2 { margin-left: 15px; } /* RTL override */ .selector-2 { margin-left: 0; /* resetting the value */ margin-right: 15px } -
Positioned elements. The horizontal property should be set to
autoand the counter property takes its value. For example:.selector { position: absolute; left: 50px; top: 10px; } /* RTL override */ .selector { left: auto; right: 50px; } -
Border radius. It follows a pattern similar to the clockwise approach. If it isn’t set to a single value, it should change. For example:
.selector { border-radius: 0 5px 5px 0; } /* RTL override */ .selector { border-radius: 5px 0 0 5px; } -
Transforms. Some values of transform like
rotateshould be changed manually. The following arrows are rotated to point to the beginning of the text. Check the CSS tab:See the Pen JFput by Ahmad Alfy (@ahmadalfy) on CodePen.
-
Background position. This is one of the most complicated issues when you modify a design to become RTL. The main problem is that the starting point for the horizontal positionning of a background is always set from the left. This has several implications. For simplicity, let’s start with the condition where the horizontal position of the background is set to 0. The override should change that to 100% as follow:
 .selector {
   background-position: 0 5px;
 }
 /* RTL override  */
 .selector {
   background-position: 100% 5px;
 }
If we have an element without a defined width that has a background image starts after 5px from the left, there is no way to make its background start 5px from right. If the element width is set to a fixed value, then we could define a specific x position using pixels. Consider the following example
.selector {
  width: 100px;
  padding-right:15px;
  background-position: 5px 5px;
}
/* RTL override  */
.selector {
  padding-right:0;
  padding-left: 15px;
  background-position: 195px 5px;
}
There is an ugly solution to fix this issue. The image could be created with the desired amount of empty pixels and set the horizontal background position to be 100%.
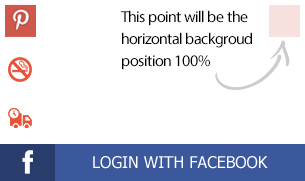
What’s the case if we are using sprites? That’s another disaster! Setting the horizontal background position to 100% will not work because the total image dimensions are different from the single sprite we are trying to use. For example if we are trying to use Pintrest icon on the following sprite, setting the horizontal background position to 100% will display a blank space:
The ultimate fix to overcome all this headache is to use psuedo-elements and create inline blocks using the background dimensions and position it wherever we like.
The implementation
There are several approaches to change an existing deisgn to make it RTL. None of the approaches are 100% automatic.
-
Using different stylesheet for the RTL version
This method became popular recently due to the rise of different tools that automatically parse the CSS files and produce an RTL version.
Pros:
- Very easy to use and to maintain.
Cons:
- The generated files contain all the properties even those that shouldn’t be overridden. When the user try to switch between the RTL and LTR versions, he will load a lot of unnecessary CSS again. 200KB of CSS could be overridden only by 10KB of CSS. This approach will create a new 200KB file.
-
Loading an additional file that contain the overriding information
Creating a file that contain only the necessary properties that override the original CSS and load it last.
Pros:
- The result file size is usually small.
- It is easy to maintain.
Cons:
- Makes an extra HTTP request.
-
Adding overrides to the same CSS file.
This is by far the best approach. The overriding CSS is added to the same file. To make is specific to the RTL pages, we either add a specific class to the
htmltag of these pages or use the attribute selector like this:.selector { property: value; } /* Using class to override */ html.rtl .selector { property: value; } /* Using data attribute to override */ [dir="rtl"] .selector { property: value; }We could even do better by adding SCSS to the flavor! Using the parent selector the overriding information could be added near the original declaration granting us better readability and easier maitenance.
 /* SCSS version */
 .element {
   padding: 0 0 10px 15px;
   margin-left: 25px;
   [dir="rtl"] & {
     padding: 0 15px 10px 0;
     margin-left: 0;
     margin-right: 25px;
   }
 }
 /* The produced CSS will be: */
 .element {
   padding: 0 0 10px 15px;
   margin-left: 25px;
 }
 [dir="rtl"] .element {
   padding: 0 15px 10px 0;
   margin-left: 0;
   margin-right: 25px;
 }
Final thoughts
I have helped converting a lot of existing websites to become RTL over the past few years. There is a Chrome extension called My Style that faciliated the process for me. This extension add a textarea to the pages the user visit. It is toggled by pressing ctrl + m. Whenever CSS declaration is added to it, it will affect all the pages on the this domain. The CSS isn’t removed until the user remove it manually. Using this extension, I start adding the overrides till I get the prefect result.
If you created RTL websites before or use a different approaches, please feel free to leave comments or questions.
I would like to express my gratitude for the awesome David Walsh for taking time to review this article.